House Foundations in NZ: Slab, Rib Raft or Piles for Your New Build
Quick answer: House foundations in NZ for a timber-framed home come in three main types: a concrete slab-on-ground, a pod system such as a rib raft, or timber piles under a suspended floor. Your ground report decides which.
The foundation is the first thing built on your section and the one part of the house you can’t change later. Walls can be moved and kitchens replaced. A slab, once poured, stays where it is for the life of the building.
You may never be asked to choose a foundation in so many words. The designer draws one, an engineer may check it, and it turns up in the consent drawings as a line on a plan. That’s fine, as long as you know what the choice locks in: how warm the floor will be, whether tiles will crack, whether underfloor heating is possible, and how the ground under your section shapes all of it.
Two changes make this worth reading now rather than later. Standards New Zealand is reviewing public comments on a revised NZS 3604, the standard most timber-framed homes are built to, with new foundation rules in the draft. And from 27 November 2026, only the 6th edition of the Building Code’s energy efficiency rules can be used to show your floor is insulated well enough.
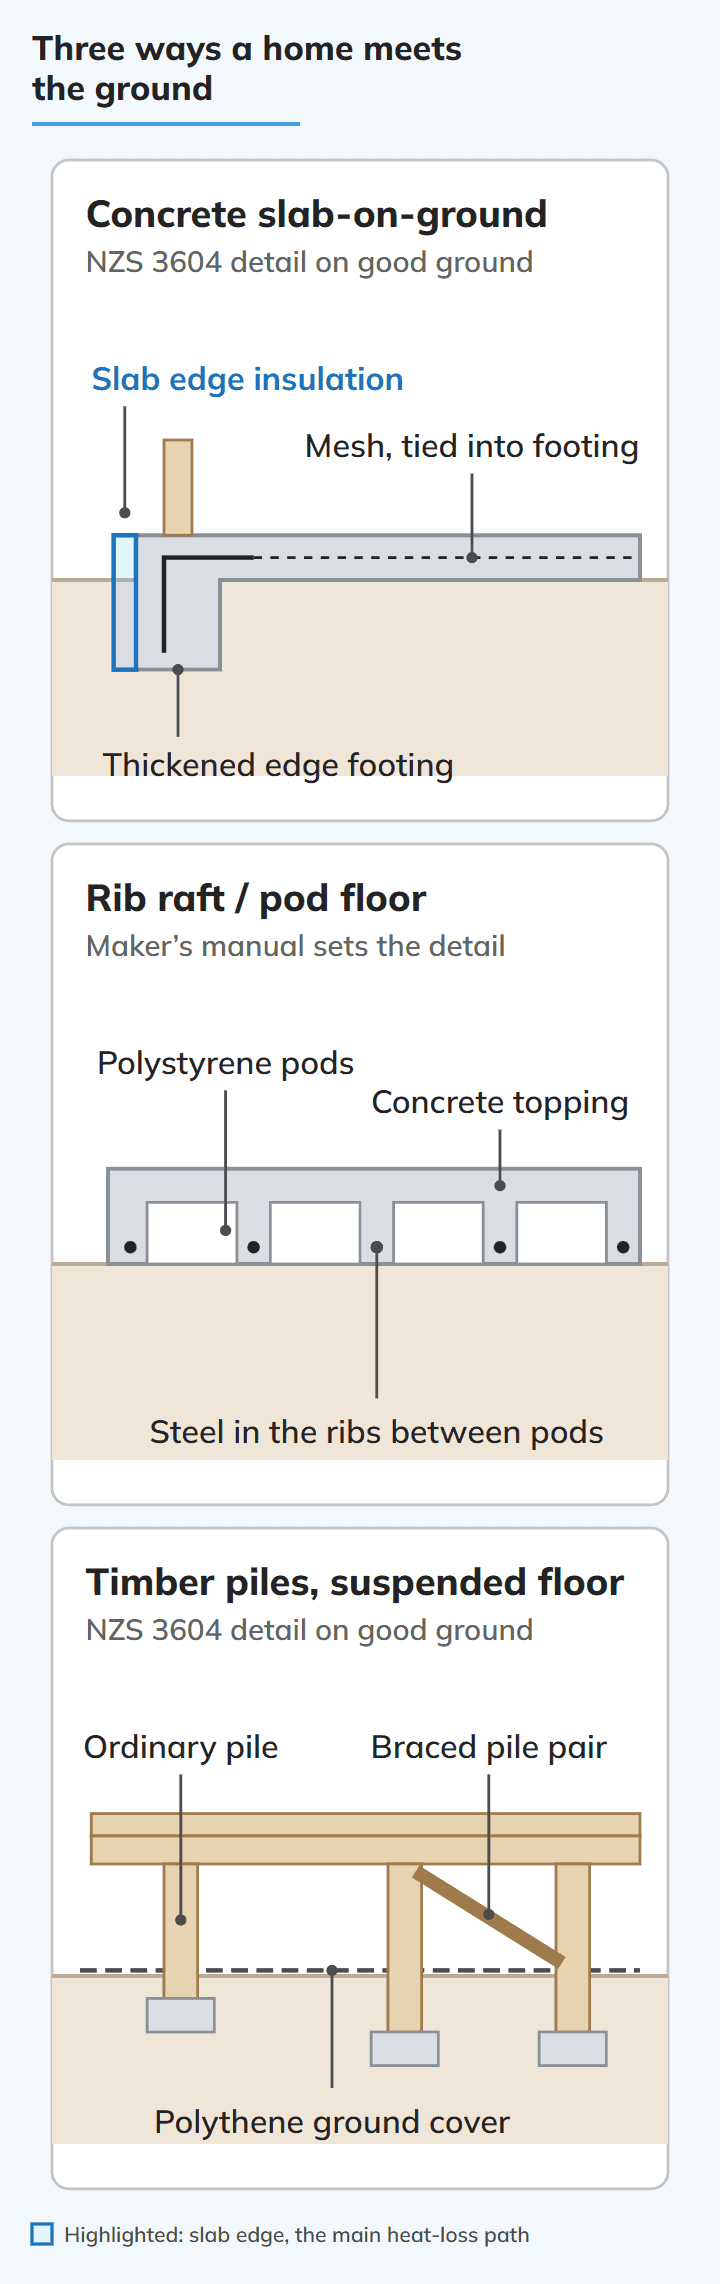
The Three House Foundations NZ Builders Use, and How Each One Works
Strip away the product names and there are three ways a light timber-framed house meets the ground in New Zealand. Each one carries the house’s weight down into the soil and resists the sideways push of wind and earthquakes, but they do it differently, and the difference shows up in the finished home.
Concrete slab-on-ground
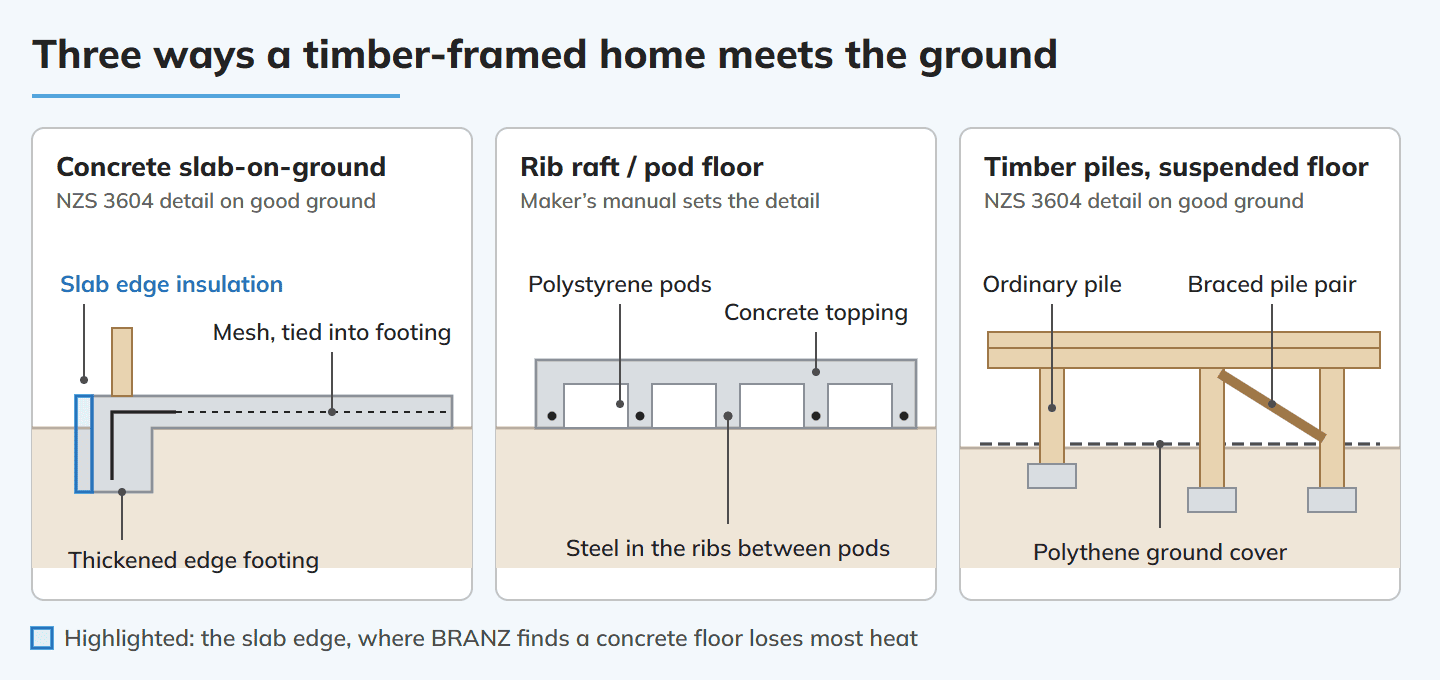
A slab-on-ground is a reinforced concrete floor poured directly onto prepared ground, with thickened footings around the edge and under any load-bearing walls inside. The floor you walk on and the foundation are one piece of concrete. NZS 3604:2011, the standard for timber-framed buildings, sets out slab details for houses on good ground, so a straightforward slab doesn’t need a structural engineer to design every element from scratch.
The Canterbury earthquakes changed how these slabs are tied together. According to BRANZ, the Building Code’s structure Acceptable Solution, B1/AS1 (a pre-approved way of meeting the Code), removed the option of an unreinforced slab sitting loose on its footing for single-storey houses. Slab reinforcing now has to be tied into the footing reinforcing, typically with R10 starter bars at 600 mm centres that lap the slab mesh by 300 mm.
Rib raft and other pod systems
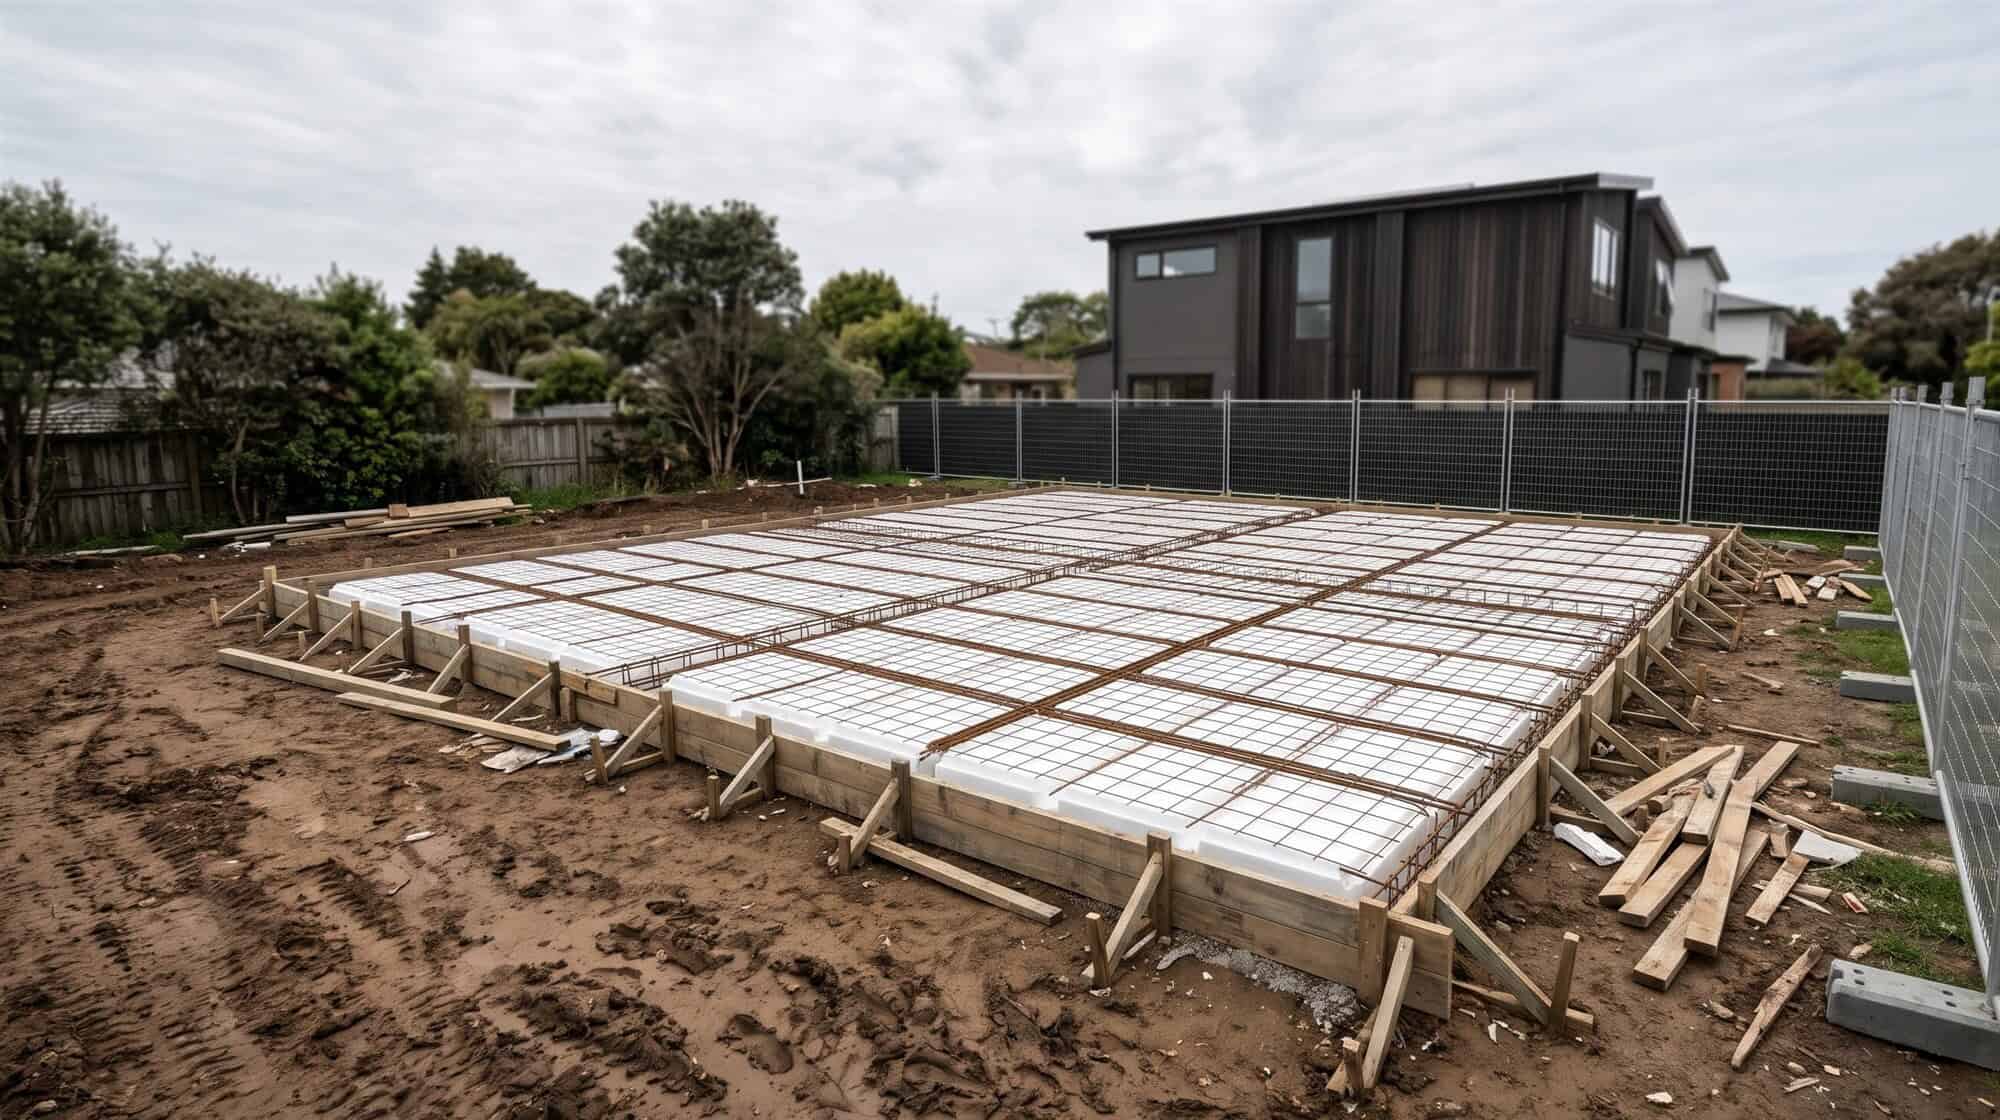
A raft slab spreads the house’s load across the whole floor area rather than concentrating it on deep footings. The common New Zealand version is a pod system: polystyrene blocks laid in a grid on the ground, with steel reinforcing in the gaps between them, all filled with concrete in one pour. The concrete ribs between the pods act as beams and the polystyrene sits underneath the floor.
Firth, which makes RibRaft, describes its system as sitting “on” the ground rather than “in” it, built from polystyrene pods, steel reinforcing rods, plastic spacers and a specific concrete mix. On its RibRaft product page, Firth says the system carries a CodeMark certificate (under a product certification scheme for building products), and it credits the system with time, labour and cost savings from not digging footings. Those are the maker’s claims, not ours.
Pod systems are proprietary products, not a single generic design. BRANZ notes that many proprietary insulated slab and raft systems fall outside the Acceptable Solution and are consented as alternative methods, and it advises looking for a BRANZ Appraisal when considering one. That isn’t a warning against them. It means the system’s own technical manual, appraisal or certificate is what the council reads, so your designer has to follow it to the letter.
Timber piles and a suspended floor
The third option lifts the floor off the ground. Treated timber or concrete piles are set into the soil, bearers and joists span between them, and the floor sits on that frame with a ventilated space underneath. It’s still a current NZS 3604 solution for new homes on suitable ground.
Not every pile does the same job. Ordinary piles carry vertical load.
BRANZ describes braced piles as pairs of piles with a diagonal timber brace between them to resist sideways load, set deeper than ordinary piles. Some piled floors also have a concrete perimeter foundation wall. For those, BRANZ’s summary of the NZS 3604 details shows 12 mm deformed bars as the standard reinforcing. Wherever the wall is against the ground, the steel needs at least 75 mm of concrete cover.
Why a piled floor lives or dies by its connections
The weak point of a piled floor in an earthquake has rarely been the pile itself. BRANZ’s work on piled foundations cites a 2007 study of 80 Wellington houses that found 39% had inadequate subfloor bracing and 76% had some form of fixing deficiency, from corrosion to fixings that were wrong or missing. After the Canterbury earthquakes, BRANZ’s subfloor inspections confirmed the connection problem, and BRANZ says a continuous concrete perimeter foundation probably saved many piled houses from much more serious damage.
Those were mostly older houses, and a new NZS 3604 floor is braced and fixed to a detailed specification. The lesson still carries into a new build: on a piled floor, the brace layout and the fixings between pile, bearer and joist are what you’re paying for. BRANZ notes, for example, that braced piles and anchor piles need connections rated at 12 kN to the bearers or joists. Those are the details an inspector and your builder should be checking before the floor goes down.
The ground under a suspended floor stays damp
A ventilated subfloor isn’t a dry one. BRANZ points out that subfloor ground that looks and feels dry is likely to be damp below the surface, and that an effective way to manage the moisture risk is to cover the ground completely with 250 micron polyethylene with taped joins. It also flags that floor insulation under a suspended floor can be moved by wind where the base of the house isn’t fully enclosed, and recommends fixing durable sheeting beneath it to hold it in place.
Here’s how the three compare on the things you’ll actually notice:
| What you’ll notice | Slab-on-ground | Rib raft / pod system | Timber piles, suspended floor |
|---|---|---|---|
| How it’s designed | NZS 3604 details on good ground | Maker’s technical manual, appraisal or certificate; specific design on some ground | NZS 3604 details on good ground |
| What the floor is | Reinforced concrete, poured on the ground | Concrete ribs and topping over polystyrene pods | Timber joists and bearers on piles |
| Insulation to think about | The exposed slab edge (BRANZ: the biggest heat-loss path) | As set by the maker’s technical manual | Insulation between the floor joists |
| Underfloor heating | Possible, with insulation to the H1 minimum | Possible, with a thicker topping (Firth: 110 mm) | Not cast into the floor; ask your designer |
| Later access to pipes | Cast in; no access | Cast in; no access | Reachable from the subfloor |
🏠 Development tip: Ask your designer which of the three your concept plans assume, and why. If the answer is “that’s what we usually do”, ask what the ground report says before you go further.
The system on your plans is a consequence of your ground, not a style choice. Which brings us to what actually decides it.
What Decides Your Foundation: Ground, Slope, Storeys and the Floor You Want
You may already have a view on foundations from a friend’s build or a show home. Hold it loosely until the ground report is in. Four things set the options, and preference comes fifth.
The ground comes first
NZS 3604 solutions only apply on ground that meets its definition of “good ground”, and the Building Code’s own definition adds conditions the standard’s number doesn’t. Whether your section qualifies is a question for a geotechnical assessment, not for the foundation designer’s preference. We cover what that testing involves, and what happens when a site fails it, in our guide to reading a geotech report before you build.
Once the report is in, the foundation follows from it.
Good ground opens all three systems. Ground that doesn’t meet the definition moves you into specific engineering design, where an engineer sizes the foundation to the measured soil rather than to the standard’s tables. Firth’s own FAQ, for example, says RibRaft foundations on some poorer ground classes need specific engineering design. A pod system isn’t a way round poor ground. It’s one of the designs an engineer might choose for it.
Slope changes the arithmetic
A slab wants a flat platform. On a gently sloping section that means cutting into the high side, filling the low side, or stepping the slab, and each of those has its own cost and drainage consequences. On a steeper section, piles or poles on the downhill side are the other route designers look at.
Sloping sites have their own design questions (stepped slabs, split levels, retaining, and how height rules bend on a fall), and our sister company Sonder Architecture covers them in its guide to designing a home for a sloping Auckland section. This article sticks to the flat-to-gentle sites where all three systems are genuinely on the table.
Storeys and what the revised standard proposes
A single-storey or two-storey home can sit on any of the three systems within NZS 3604’s scope. Three storeys is where the draft revision of the standard draws a line. BRANZ’s summary of the proposed changes says three-storey buildings where the top storey isn’t contained within the roof space would have to use concrete floor-slab foundations, because suspended ground floors wouldn’t be permitted for them under the draft’s clause 6.1.1.
That rule is a proposal, not the law in force. It does tell you which way the people writing the standard are leaning, and if you’re planning three full storeys on a tight Auckland section, it’s a reason to assume a slab from the start.
The floor you want to live on
Raise this one at your first design meeting. If you want large-format tiles through the living area, polished concrete, or heating coils in the floor, you’re already most of the way to a slab or pod system. If you want a timber floor with a bit of spring in it, or easy access to plumbing under the house for the next 50 years, piles start to look better.
Neither is right. They’re trade-offs, and the time to make them is at concept design, while moving a shower or changing a floor finish costs a few lines on a drawing.
🏠 Development tip: Write down the three floor finishes you care most about (kitchen, bathrooms, living) before your first design meeting. They tell your designer more about the right foundation than any brochure will.
Concrete Slabs, Shrinkage and the Finished Floor
A concrete floor looks finished the day after it’s poured. It isn’t. What happens in the following year decides whether your tiles stay in one piece and whether the floor keeps the house warm.
Concrete keeps shrinking for a year
According to BRANZ, concrete shrinks as it sets and keeps shrinking for at least 12 months after it’s placed, with about half of that shrinkage happening in the first four months. Shrinking concrete cracks. The question is only whether it cracks where someone planned it to.
That’s the job of shrinkage control joints: lines cut or formed into the slab so it cracks along them, neatly, rather than at random. BRANZ says these should be formed within 24 to 28 hours of pouring, and that the designer should show their locations on the floor plan. So on a typical build, the decision about where your slab will crack is made on paper and executed within about a day of the pour.

Why your tile layout belongs in the foundation drawings
BRANZ is blunt about the consequence: ceramic tiles should not be laid across control joints, because they are very likely to crack there. Movement joints in the tiling should line up with the control joints in the concrete, and BRANZ recommends movement joints in tiled floors at no more than 4.5 m spacing. Even vinyl struggles to hide a control joint, which is why BRANZ suggests placing them under internal walls where possible.
The timing matters as much as the layout. BRANZ describes saw-cutting as a practical way to form a free joint (one with no reinforcing running through it), cut to half the slab’s depth. In summer, it says, the cut should be made no later than 24 hours after pouring; in winter, within 48 hours. That window falls in the first two days after the pour, while you may not even know the concrete is down.
If you’re planning large tiles across an open-plan living area, the tile layout and the slab joint layout need to be drawn together. Left to chance, a joint lands in the middle of the room and either your tiler works around it or a tile line cracks within the first year.
Where a concrete floor loses its heat
Most people picture heat sinking straight down into the ground. BRANZ’s research points somewhere else. In its article on slab edge insulation, BRANZ says the greatest heat-loss path in an uninsulated slab runs sideways through the slab and out of its exposed vertical edge, close to the bottom of the external walls.
The fix is modest. BRANZ puts the insulation needed to largely stop that loss at about R1.0 (an R-value measures resistance to heat flow; the higher the number, the better it insulates), which polystyrene can reach at 20 to 25 mm thick. It prefers extruded polystyrene (XPS) to expanded polystyrene (EPS), because XPS is more durable and absorbs less water. Any exposed slab-edge insulation must be covered to protect it from moisture, sunlight and knocks, either with a plaster coat applied on site or with a prefinished product. Slab edge insulation isn’t mandatory under the Building Code’s energy efficiency clause, but BRANZ calls the improvement it gives “huge”.
The shape of your house matters too. BRANZ’s worked example compares two 165 m² slabs: a simple rectangle with 57.25 m of edge, and a complex plan with 103 m of edge. Same floor area, nearly twice the edge, and so far more room for heat to escape. Every extra corner in a plan is extra slab edge to insulate.
Cladding plays a part as well. BRANZ explains that brick or other masonry veneer sits on a rebate cut into the slab edge, which leaves less slab edge exposed to insulate and moves most of the heat loss to the veneer and rebate junction. With a masonry veneer, BRANZ says, combining edge insulation with insulation under the slab is much more effective than edge insulation alone. Insulation under the footings themselves goes further again, but BRANZ notes it needs specific engineering design, and the inner face of the footing has to be insulated too for it to pay off.
H1 6th edition: what changes on 27 November 2026
Building Code clause H1 sets the energy efficiency a new home has to meet, and its Acceptable Solution and Verification Method are the usual ways of showing compliance. BRANZ’s H1 floors refresher says the 6th edition of H1/AS1 and H1/VM1 is the only edition that can be used after 27 November 2026.
Under that edition, the calculation method has no minimum R-value for an unheated slab-on-ground floor: the slab is traded off against the walls, roof and windows in a calculation against a reference building.
Heated floors are different. BRANZ lists minimum construction R-values of R2.5 in climate zones 1 to 3, R2.8 in zone 4 and R3.0 in zones 5 and 6 (a floor heated only in rooms with a shower, bath or toilet doesn’t count as heated).
Your designer will confirm which zone your site sits in and run the numbers. The two compliance routes behave differently: the calculation method compares your home’s construction R-values against a reference building, while the modelling method uses computer modelling of energy use and, BRANZ says, typically expects the slab to meet or beat the reference building’s R-value. BRANZ and the New Zealand Green Building Council both offer free H1 calculation tools that designers use to check a pass or fail. Sonder Architecture explains the wider rule set in its guide to the H1/AS1 6th edition insulation rules.
For pod floors, the maker’s manual sets the details. Firth’s FAQ says its standard RibRaft topping is 85 mm thick, rising to 100 mm for a decorative concrete finish and 110 mm where heating coils under 25 mm are embedded in the topping. Those numbers belong in the conversation the moment someone mentions polished concrete or underfloor heating.
🏠 Development tip: If underfloor heating is even a maybe, say so before the foundation is designed. Adding it later means a different topping thickness, a higher insulation minimum, and possibly a different slab.
Important: Foundation design, slab insulation and H1 compliance are matters for your designer, a structural or geotechnical engineer and your building consent authority. This article explains how the rules work in general; it isn’t design or compliance advice for your home. Confirm the details for your site with them and with Auckland Council.
Where the Foundation Sits in Your Build Programme
The foundation is the first major stage of construction. Knowing the order helps you read the first weeks on site, when a lot is checked and not much seems to rise.
Designed before consent, built after it
The foundation is decided in design, checked in the building consent, and built once the consent is granted. In our programme, pre-construction (design, documentation and consenting) runs 4 to 8 months, and construction from site start to practical completion runs 6 to 10 months; the foundation sits at the very start of that second stretch. You can see how the stages line up in our building process, from the land to the keys.
Because the foundation is drawn so early, it’s also where design changes get expensive fastest. Moving a bathroom after the consent drawings are done can mean moving drains that are about to be cast into concrete. That’s one reason we keep the design, the build and the project management under one roof: the person drawing the slab and the person building it are working from the same set of decisions.
Inspections happen before the concrete hides everything
Under section 90 of the Building Act 2004, every building consent comes with the condition that the building consent authority’s inspectors can inspect the building work while it’s being done, and the inspection provisions are endorsed on your consent. The consent sets out which inspections your build needs.
The practical point for a foundation is simple: reinforcing steel, pods and under-slab drains can only be seen before the concrete goes in. Any inspection of them has to happen before the pour, so the pour date and the inspection have to line up. If a pour date moves, ask your project manager whether an inspection is the reason.
Who is allowed to design and build it
Foundations are not a DIY job, and the law says so directly. The Building (Definition of Restricted Building Work) Order 2011 defines a building’s “primary structure” as the elements that help it withstand vertical or horizontal loads, and it names foundations and subfloor framing in that list. Clause 5 makes building or altering the primary structure of a house Restricted Building Work, and clause 6 does the same for designing it. Under section 84 of the Building Act, Restricted Building Work must be carried out or supervised by a Licensed Building Practitioner (LBP), with a separate, narrow route for owner-builders.
On our builds, a dedicated project manager is your main point of contact from the start, and that person tracks who is licensed for each part of the foundation work and which records each one hands over. If you’d like to talk through how that would work on your section, book a free first conversation about your build; there’s no obligation and no cost to that first meeting.
What it does to cost, without the guesswork
We don’t quote a foundation-only price in an article, because the honest answer depends on the ground report, the system, the footprint and the shape of the plan.
What we can tell you is what moves the number:
- ground that needs specific engineering design;
- a site that needs cut and fill;
- a complex plan with a long perimeter;
- heated floors and decorative finishes that change the slab specification;
- how much insulation goes on the edge and underneath.
For whole-of-build numbers, our guide to per-square-metre build rates for a new home sets out what the published figures include and leave out.
🏠 Development tip: Ask your builder for the inspection list on your consent before site works start, and ask which inspections fall in the foundation stage. Knowing them in advance takes the surprise out of a moved pour date.
What to check as the owner before the pour
You don’t need to read reinforcing drawings to protect yourself at this stage. A few questions, asked at the right time, cover the points this article has raised:
- Which foundation system is on the consented plans, and does the geotechnical report support it on your ground?
- Where will the slab’s control joints run, and has the tile or floor-finish layout been drawn to match them?
- If you want underfloor heating, is it on the consented drawings with the insulation it needs, and is the topping thickness right for it?
- What slab edge insulation is specified, and how will it be protected from moisture and knocks once it’s exposed?
- Which inspections fall before the pour, and are they booked?
- Which Licensed Building Practitioners are carrying out or supervising the foundation work?
On our builds, your project manager answers these with you, so the list becomes a conversation rather than homework.
What Is Changing: the NZS 3604 Revision and Your Foundation
NZS 3604 matters more to your home than its name suggests. Standards New Zealand says it applies to approximately 93% of New Zealand light timber-framed buildings, and it is referenced, with modifications, through six Building Code Acceptable Solutions, including B1/AS1 for structure and B2/AS1 for durability. Following it is an established way of showing a house’s structure complies.
Where the revision is up to
Standards New Zealand’s revision page, last updated on 27 October 2026, sets out the current position. Public consultation on the draft closed at 5pm on 22 September 2026. The standards committee began reviewing public comments on 13 October 2026, and Standards New Zealand says it received more than 2,300 comments on the draft.
NZS 3604:2011 is still the current standard, and it stays current until a new edition is published. Even after that, Standards New Zealand says the 2011 edition remains a recognised compliance pathway, as referenced in the Acceptable Solutions, until those Acceptable Solutions are amended. In the meantime, the new edition can be used as technical evidence to support an Alternative Solution.
What the draft proposes for foundations
Among its proposed changes, Standards New Zealand lists “foundation solutions for a wider range of ground conditions”. BRANZ’s summary of the draft fills in the detail:
- Timber-framed buildings could be built on moderately liquefiable and moderately expansive ground under the standard, with extra site assessment that typically needs expert geotechnical advice.
- Pile footing plan dimensions in the draft’s Table 6.1 increase for all site categories, which BRANZ says effectively doubles the required bearing area.
- On potentially liquefiable sites, piles couldn’t be combined with concrete foundations such as an attached garage slab.
- Three-storey buildings with a full top storey would have to sit on a concrete floor-slab foundation.
- Underfloor insulation provisions are expanded with more detail on type and thickness, while insulation beneath the foundations themselves stays excluded.
BRANZ also expects that, in practice, building consent authorities will want specialist geotechnical input before accepting anything other than low-risk or well-understood sites under the expanded scope.
Two more draft clauses touch the decisions in this article. BRANZ says clause 7.7, covering slabs on good ground, includes provisions for underfloor heating pipes, and clause 7.6.12 allows larger framing overhangs at the slab edge to make room for slab edge insulation. The draft’s clauses for liquefiable and expansive sites (7.8 and 7.9) limit building dimensions and exclude three-storey construction on those sites, and new clauses add concrete perimeter foundations for liquefiable ground (6.15) and deeper piles on expansive ground (6.16).
BRANZ links the expansive-clay changes to a recognition that these soils are more widespread across New Zealand than previously thought, and the liquefaction changes to lessons from the Canterbury earthquakes. If your section sits on clay, the draft is a sign that the questions your engineer asks about it are going to get more detailed, not less.
What it means for a home you’re designing now
If your design is being drawn this year, it will be drawn and consented to NZS 3604:2011 as referenced in the current Acceptable Solutions, because that is the edition in force. The draft isn’t something your designer has to follow. It is a useful signal of where the standard is going, especially on piles, which the draft treats more conservatively than the current edition.
Imagine your plans show a piled timber floor for the house and a concrete slab for the attached garage, and the geotech report flags the site as potentially liquefiable. Under the draft, that combination wouldn’t be allowed. It’s worth asking your engineer whether a design that relies on it is one you want to own when the new edition arrives.
Important: The NZS 3604 revision is a draft under committee review, not the standard in force. Until a new edition is published and referenced in the Building Code Acceptable Solutions, NZS 3604:2011 applies. Foundation design and construction are Restricted Building Work: confirm what applies to your home with your designer, a Licensed Building Practitioner, an engineer and Auckland Council.
🏠 Development tip: Ask your designer one direct question: “Would this foundation still comply under the draft NZS 3604?” A yes is reassuring. A no isn’t a problem today, but it’s worth understanding why.
Getting the Foundation Right Is Mostly About Asking Early
None of the three systems is the right answer in the abstract. A slab, a pod floor and a piled floor can each be the right call, and each can be the wrong one. What decides it is the ground report, the slope, how many storeys you’re building, and how you want to live on the floor. Raise tiles, heating and future access at the first design meeting, while changing the answer still costs nothing but a redrawn line.
➡ Book a free consultation with Superior Homes
➡ See our completed Auckland projects
➡ See where the slab, piles and first inspections sit in our build
What types of house foundations are used in NZ?
For a timber-framed home there are three main types: a reinforced concrete slab poured on the ground, a pod system such as a rib raft (concrete ribs and topping over polystyrene pods), and timber or concrete piles holding up a suspended timber floor. NZS 3604 sets out slab and pile details for houses on good ground, while pod systems follow the maker's own technical manual, appraisal or certificate.
Is a concrete slab or timber piles better for a new house in Auckland?
Neither is better in the abstract. The geotechnical report sets the options first, then slope, the number of storeys and the floor finishes you want narrow them down. A slab or pod floor suits large tiles, polished concrete and underfloor heating. A piled floor keeps pipes reachable from underneath and suits some steeper sites. Your designer and engineer should explain why your plans show the system they do.
What is a rib raft foundation?
A rib raft is a pod floor: polystyrene pods laid in a grid on prepared ground, steel reinforcing in the gaps, and concrete poured over the lot so the ribs act as beams under a concrete topping. Firth, which makes RibRaft, says the system sits on the ground rather than in it and carries a CodeMark certificate. Firth also says RibRaft foundations on some poorer ground classes need specific engineering design.
Can I have underfloor heating in a concrete slab or rib raft floor?
Yes, but plan it before the foundation is designed. Under the H1/AS1 and H1/VM1 6th edition, BRANZ lists minimum construction R-values for heated floors of R2.5 in climate zones 1 to 3, R2.8 in zone 4 and R3.0 in zones 5 and 6. For RibRaft, Firth says the topping rises from 85 mm to 110 mm where heating coils under 25 mm are embedded.
Do I need to insulate a concrete slab floor in NZ?
It depends on how compliance is shown. BRANZ says the H1/AS1 calculation method sets no minimum R-value for an unheated slab-on-ground floor, but the modelling method typically expects the slab to match the reference building, and heated floors have minimums. BRANZ also found the exposed slab edge is the biggest heat-loss path, and about R1.0 of encapsulated polystyrene there makes a large difference.
Can I lay tiles straight onto a new concrete slab?
Not without planning the joints. BRANZ says concrete keeps shrinking for at least 12 months after it is placed, about half of it in the first four months, and that ceramic tiles should not be laid across the slab's shrinkage control joints because they are very likely to crack there. Tiling movement joints should line up with those control joints, at no more than 4.5 m spacing.
Who is allowed to design and build house foundations in NZ?
Foundations are part of a house's primary structure under the Building (Definition of Restricted Building Work) Order 2011, which makes both designing and building that structure Restricted Building Work. Section 84 of the Building Act 2004 requires Restricted Building Work to be carried out or supervised by a Licensed Building Practitioner, with a separate route for owner-builders. Engineers design foundations on ground outside NZS 3604.
Does the NZS 3604 revision affect a house I am designing now?
Not directly. Standards New Zealand says NZS 3604:2011 remains the current standard until a new edition is published, and stays a recognised pathway until the Building Code Acceptable Solutions are amended. The draft closed for comment on 22 September 2026 and the committee began reviewing comments on 13 October 2026. It proposes bigger pile footings and slab-only foundations for three full storeys.
Does the council inspect foundations before the concrete is poured?
Your building consent lists the inspections your build needs, and section 90 of the Building Act 2004 lets the building consent authority's inspectors inspect building work while it is being done. Reinforcing, pods and under-slab drains can only be seen before the concrete goes in, so any inspection of them has to happen before the pour. Ask your builder for the inspection list early.
How much do house foundations cost in NZ?
There is no honest single figure for foundations alone. The cost depends on the ground report, the system, the size and shape of the footprint, any cut and fill on the site, and choices such as heated floors, decorative finishes and slab edge insulation. A complex plan has more slab edge than a simple one of the same area. Ask your builder for a priced breakdown once the ground report is in.
Related guides
- How long each stage of an Auckland build takes, from contract to keys
- The title, LIM and site checks to make before you buy land to build on
- What happens at handover when your new home is finished
Free Guides: Avoid Costly Mistakes When Building or Developing
Read our free guides — what to know before you build or develop in Auckland, put together by the Superior Homes team.
References
- Standards New Zealand, NZS 3604:2011 revision updates
- BRANZ, Proposed changes to NZS 3604: Foundations
- BRANZ, H1 floors refresher
- BRANZ, Insulated unheated slab-on-ground concrete floors
- BRANZ, Slab edge insulation
- BRANZ, Concrete slabs and control joints
- BRANZ, Tying up those slabs
- BRANZ, Constructing a braced pile
- BRANZ, Concrete foundation wall reinforcing
- BRANZ, Strengthening piled foundations
- Firth, RibRaft floor system
- Building (Definition of Restricted Building Work) Order 2011, clauses 3, 5 and 6
- Building Act 2004, section 84: Licensed building practitioner must carry out or supervise restricted building work
- Building Act 2004, section 90: Inspections by building consent authorities